How To Use OpenCV In Qt

2

If you ever had been interested in image processing anytime back, chances are high you did head of OpenCV. It’s an open source and highly optimized C++ based computer vision library developed Intel’s Russian research labs. It’s easy to learn and extremely powerful. Now chances are high you also must have heard of Qt framework if you ever wanted to develop a GUI application in C++. It’s an open source, cross-platform C++ framework that’s used globally to develop rich cross-platform applications. It also supports GUI features much easier to learn and use as compared to the Windows only MFC.

For an image processing application in C++ the combination of OpenCV and Qt can prove to be very effective. You can easily use OpenCV from Qt itself (the Qt Creator IDE to be precise). Let us see how can we do that.

This is assuming you already have OpenCV and Qt downloaded. If not, head over to this and this link to get them

Step 1. Install OpenCV by extracting (Linux users) or running the executable (Windows users). Then follow the instructions from OpenCV documentation here to perform the initial setup.

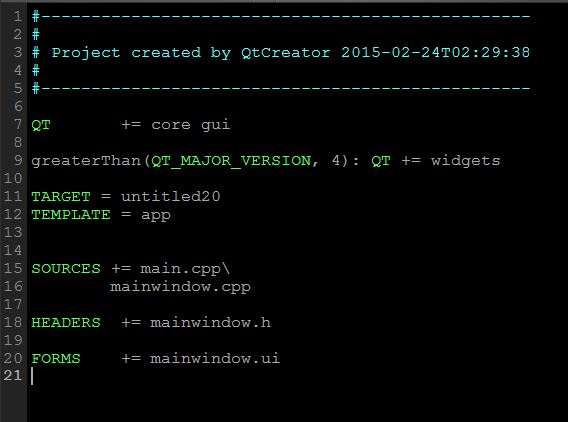
Step 2. Open Qt Creator and create a Qt application. Open the .pro file corresponding to the project. It will be listed on the projects panel as the top most file in project. It will look something like this.

1

Step 3. Add the following lines at the end of the .pro file –

INCLUDEPATH += C:\\OpenCV\\opencv\\build\\include
LIBS += C:\\OpenCV\\opencv\\build\\x86\\vc12\\lib\\opencv_core249d.lib \
        C:\\OpenCV\\opencv\\build\\x86\\vc12\\lib\\opencv_imgproc249d.lib \
        C:\\OpenCV\\opencv\\build\\x86\\vc12\\lib\\opencv_highgui249d.lib \
        C:\\OpenCV\\opencv\\build\\x86\\vc12\\lib\\opencv_ml249d.lib \
        C:\\OpenCV\\opencv\\build\\x86\\vc12\\lib\\opencv_video249d.lib \
        C:\\OpenCV\\opencv\\build\\x86\\vc12\\lib\\opencv_features2d249d.lib \
        C:\\OpenCV\\opencv\\build\\x86\\vc12\\lib\\opencv_calib3d249d.lib \
        C:\\OpenCV\\opencv\\build\\x86\\vc12\\lib\\opencv_objdetect249d.lib \
        C:\\OpenCV\\opencv\\build\\x86\\vc12\\lib\\opencv_contrib249d.lib \
        C:\\OpenCV\\opencv\\build\\x86\\vc12\\lib\\opencv_legacy249d.lib \
        C:\\OpenCV\\opencv\\build\\x86\\vc12\\lib\\opencv_flann249d.lib \
        C:\\OpenCV\\opencv\\build\\x86\\vc12\\lib\\opencv_features2d249.lib \
        C:\\OpenCV\\opencv\\build\\x86\\vc12\\lib\\opencv_nonfree249d.lib

Notice the double slash instead of a single slash. I am using Visual Studio 2013 so I mentioned vc12 folder. You can use vc11 or vc10 for Visual Studio version 2011 and 2010 respectively. Also notice the ‘d’ at the end of each file name. It indicates that the libraries are for debug mode. If you want to deploy your application use the files without the trailing ‘d’.

Select Build menu > Clean Project. Then select Build > Run qmake.

That’s it. This is all you need to do to make Qt identify OpenCV. Test it by running this short program.

#include 
#include <opencv2/opencv.hpp>

using namespace cv;

int main()
{
    String imageSrc;
    Mat image;

    std::cout << "Enter path of an image file: ";
    std::cin >> imageSrc;

    //opening image file
    image = imread(imageSrc, IMREAD_COLOR);

    if(image.empty()){
        std::cout << "\nUnable to open image.";
        return -1;
    }

    //displaying image
    namedWindow("Test Image");
    imshow("Test Image", image);

    //for preventing instant closing of image window
    waitKey(0);

    return 0;
}

If the image opens, you have successfully configured OpenCV for Qt. You will need to add those lines to .pro file for every new project you make.

How to quickly and easily add dummy entries in database

Untitled

If you have been programming for a while you’ve definitely been in a situation where you are developing something that accesses database but there are not enough entries or no entry that all in the database. You cannot verify results unless there are some entries in the database. So what can you do in this situation? Manually adding entries is okay for a few rows but that doesn’t give you the reality of a whether the application will work in a full-scale database.  there are tools available for creating such a dummy entries. While most of them are paid or limited in the number of rows they can add, the wonderful tool at generatedata.com is both free and open source.

You need to download the php application and run it on your local computer. The website is only for demo purpose and allows only 100 records. As as might have guessed you need a php server for this such as Xampp.

Step 1. Download the application as a zip file from the github repository – https://github.com/benkeen/generatedata .

Step 2. Extract downloaded zip file and copy the contents into the server’s htdocs folder

Step 3. Start your server and open the downloaded app in your browser.

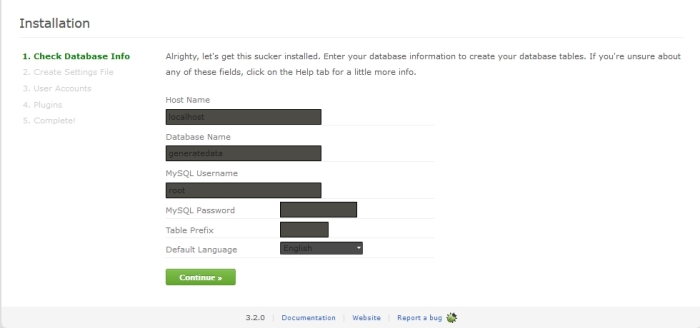
step 4. The application will ask you to configure itself.

1

You need to create a new database in your local mysql instance where the application will store all its configuration data. Now enter the name of the created database and click next. Fill the other details asked and proceed. The application will now download various plugins from the Internet and store them in the database you provided.

2


Step 5. With this you complete the installation. You can now create dummy data for your database using this tool. Let us see how you can do that.


Steps to generate dummy data

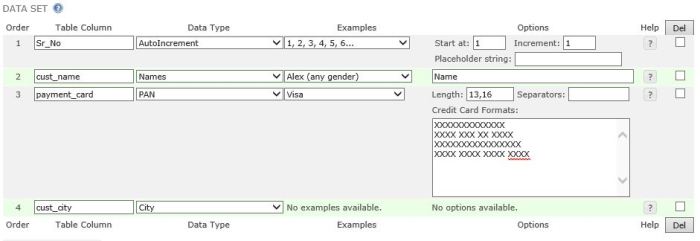
Step 1. Provide all the field names. Then provide the type of data for each field. You can select from the various predefined types such as numbers, a defined range, date, credit card numbers, locations, user-defined list and even name and surname of specific gender.

3


Step 2. Select the application type for which you want to generate the data. You can create the fields for mysql database, JSON, HTML table, Excel file, CSV and many other formats including xml.

4


Step 3. Provide the database name in which you want to insert this data. The database name will only be used only for creating the script and not for performing any instructions so you can be safe. Provide whether you want to insert the new entries for update the existing one. Yes it even supports updating the existing entries. Isn’t that cool?

5


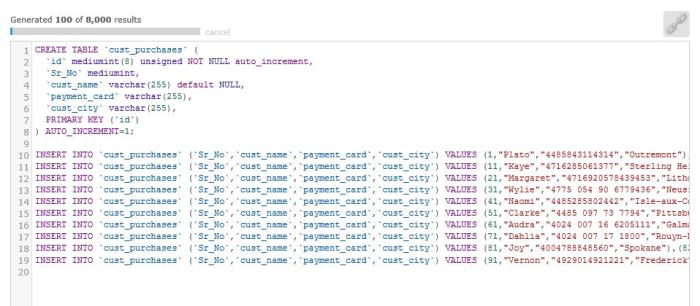
Step 4. Enter the number of entries you want to be created and hit generate. That’s it. You’ll be presented with the script for entering be generated data.

6


This tool is free, easy to use, effective and open source. No advertisements or any fee applicable. And the best of all it runs on your own computer so you do not need any Internet connection for generating such data. It also provides developer documentation for creating new data types and new export formats, making it a highly extensible and customizable solution.

Reply To WhatsApp Messages From PC (And See Other Notifications Too)

Untitled

We all have been in the situation when our phone is lying far away from us (probably being charged) and you get a message and you are too lazy or tiered to go pick the phone. You can always remember to keep the phone close but that’s not always possible. What if you could reply to WhatsApp messages and other notifications form your PC itself? There are various solutions for this problem but the one I find working best is an app called Pushbullet.

Pushbullet displays all your phone’s notifications directly on your PC or Mac or even your browser (Chromebook users rejoice!). You can reply to those notifications right from your PC itself. Here’s how to use it

Step 1. Install Pushbullet app on your phone. It’s available in Play Store and App Store.

Step 2. Install Pushbullet app on your PC. It’s available for Windows as well as Mac here – https://www.pushbullet.com/apps

You can also install it as a browser plugin on Firefox, Chrome, Opera or Safari.

Step 3. Visit Pushbullet.com and create an account. Login with the same account on your mobile.

That’s it, you’re done. You’ll now receive all your mobile notifications on PC. You do reply to WhatsApp messages, SMS, dismiss calls and even send files, links and texts to your device instantly.

notification

Windows Phone, Blackberry and Ubuntu users can try the similar app developed bu Pushbullet community using the Pushbullet API. A list of such apps is available here – www.pushbullet.com/apps

How To Bring Back The Classic F8 Boot Menu Back In Windows 8 / 8.1

Untitled

In the days of Windows 7 (and everything before it) whenever you used to get any software problem like malware, some installed programming leading to crashes or the Windows itself refusing to work properly, the first thing everyone did was to tap F8 key during start-up and go into Safe Mode. You could easily uninstall any program or driver or scan for malware from there even if Windows otherwise didn’t work.

Since Windows 8 this feature does not work as it used to. You’d have to go into tiles control panel and form advanced startup you could choose to boot into safe mode. It obviously isn’t useful if Windows itself isn’t working. There actually is  away to get back the old F8 key method to go into safe mode. Let’s see how.

All you need to do is follow these steps before your PC actually goes into trouble, sort of preparedness for disaster.

Step 1. Start command prompt with administrator rights. Press start key > search for “cmd” > right-click and choose “Run as Administrator”. Enter the admin password is prompted.

Step 2. Type this command and press enter

bcdedit /set {default} bootmenupolicy standard

That’s it. Now if you press F8 during startup you’ll get the old boot menu with various troubleshooting options.

W8_Advanced_Boot_Options-2

How To Manually Control Fan Speed In You PC

Untitled-1 - Copy

Fans in a PC are something completely overlooked most of the time. You only notice them when they start whining and then you curse them. But they are actually a very important component, flowing cool air over hot components in PC and keeping them from overheating and getting damaged. For gamers engaging in hours long Dota 2 battles or multiple rounds of close quarter warfare, heat can be a very negative thing. CPU’s throttle down when they get heated up to prevent themselves from burning which may cause frame drops for a few (critical) seconds causing you to miss that headshot.

Making sure you have ample air flowing is important. One easy thing you can do is to manually let the fans run at 100% speeds while you game. While there are many software that claim to do so, I have only found one to work perfectly every time. The wonderful open source software called Open Hardware Monitor provides all temperature readings as well as provision for manually controlling each fan’s speed.


open_hardware_monitor_1


open_hardware_monitor_2

You can manually set speeds in percentage in increments of 10% or set it to default and let the BIOS take care of it itself. Note that you can only control speeds of PWM based fans (fans with 3 or 4 pins) and not of 2 pin molex fans that plug directly into PSU molex connector. Those do not have the circuitry required for speed control.

Android: How To Transfer Contacts From Old S40 Phone To Android

So, if you are like me you did upgrade from your old Nokia S40 (Java based) phone to a generations-ahead Android smartphone. One thing that is often not so straightforward with this combination is transferring contacts. There are various expensive software available for doing that but hey, why pay for something you can do yourself for free?. As we’ll see, it’s really easy.

Step 1. In your S40 phone open the menu and got to

Settings > Sync and Backup > Create backup

Check contacts and press done. Wait for backup to complete.

                             1         3

2


Step 2. Once the backup is complete open your memory card. There will be a folder named ‘Backup Files‘ open it and you’ll find a .NBF file. If you have been taking backups in the past then there will be multiple files here. Copy the latest file to your PC.

Step 3. Rename the file from .NBF to .ZIP. If you do not see the file extension go to View > options > View tab and uncheck Hide extensions for known file types.

Step 4. Extract the .zip file you just renamed. open the folder where you extracted it. Now open

predefhiddenfolder > backup > WIP > 32 > contacts

You find multiple .vcf files. These are Virtual Card files corresponding to your contacts. Now copy this contacts folder to you Android phone’s external memory.

Step 5. open the Dialer (for Lollipop users) or People (for KitKat and other users) app. To to options (the three vertical dots) and choose

Import/Export > Import from storage

It will not search for all vcf files.

Step 6. Now choose Import all vCard files for ; obviously; importing all vcf files or Import multiple vCard files to choose which files you want to import. Click OK the process will begin. Depending on the number of files it may take up to 5 min. to complete.

Screenshot_2015-02-02-04-22-49

You’ll see all your contacts show up in your Android smartphone.